Core Bluetooth / accessing Bluetooth peripherals
Introduction
CoreBluetooth can be used for communicating with Bluetooth peripherals, or to serve as Bluetooth peripheral.
This MOP will cover steps needed to set up the project to communicate with Bluetooth accessories (as generic as possible), with all required project setup and code samples.
Serving as bluetooth accessory is a more rare requirement, however the flow is relatively similar. However, it is not in scope of this document.
This MOP will cover.
- Adding required Capabilities and Info.plist entries
CBCentralManageruse- Discovering devices, services and characteristics (
CBPeripheraluse) - Reading and writing data to/from characteristic
- Further notes
Please note that along with general procedure, this document will handle some particular cases of the Fitness device service to display some more concrete steps, which can be extrapolated for any other use.
Project setup
First of all, go to Signing & Capabilities, tap on + Capability and add Background modes. There add "Uses Bluetooth LE accessories". Please see Images 1 and 2 for details. Although this step is not required, it is suggested so the app can both communicate with accessory while not in foreground and connect to it in background.
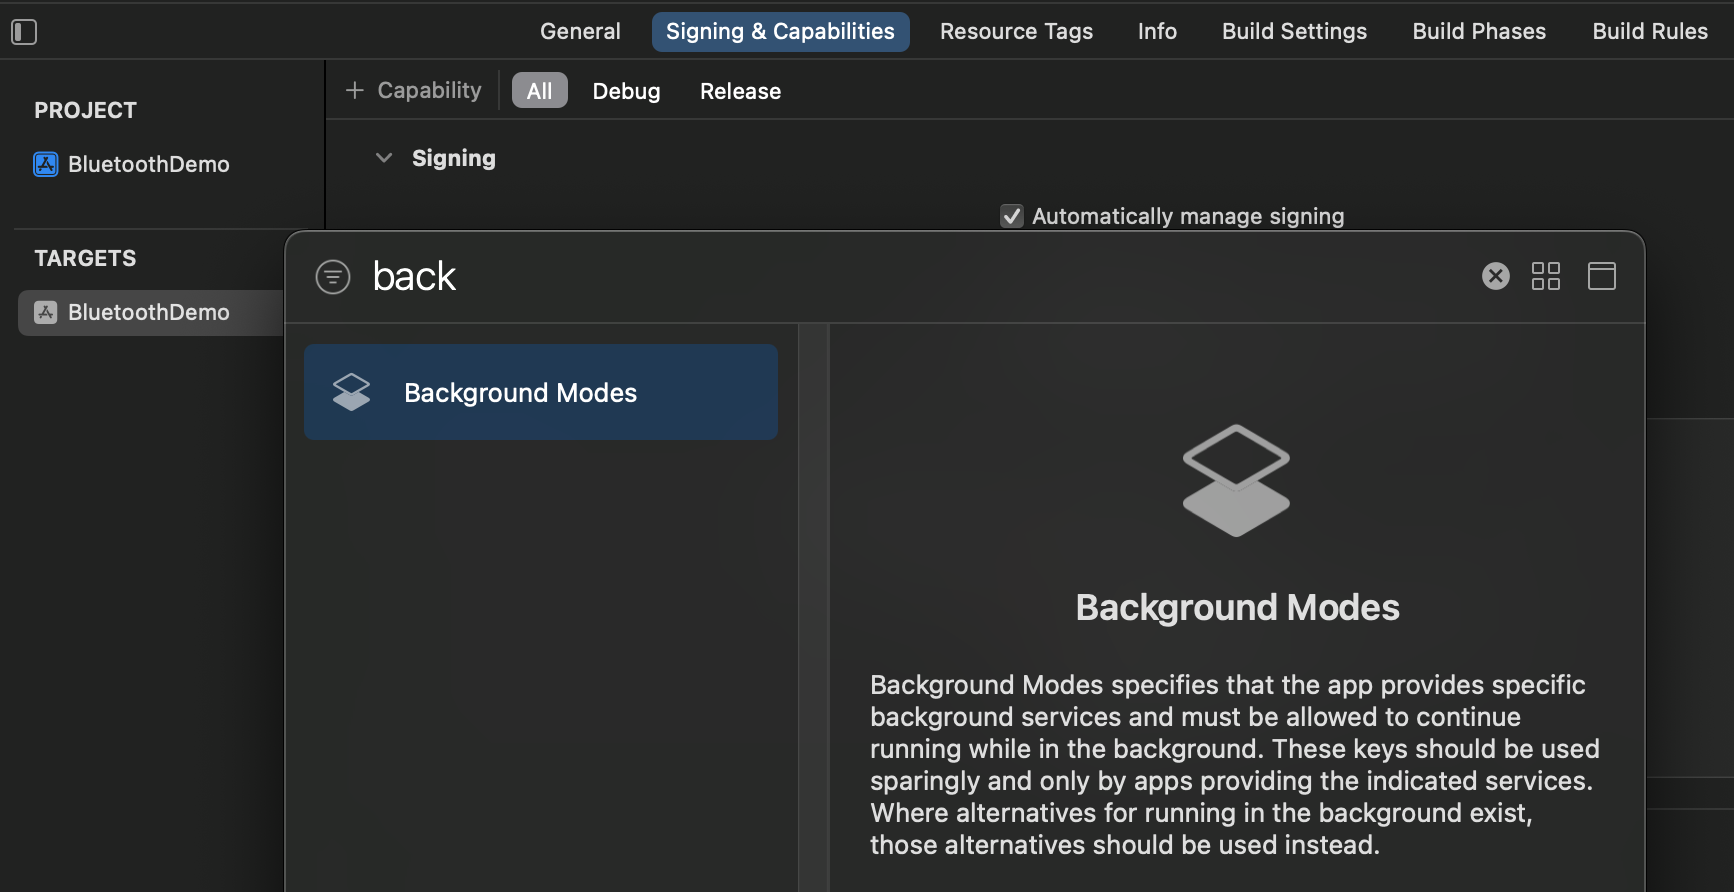 Image 1. Adding suggested Capabilities.
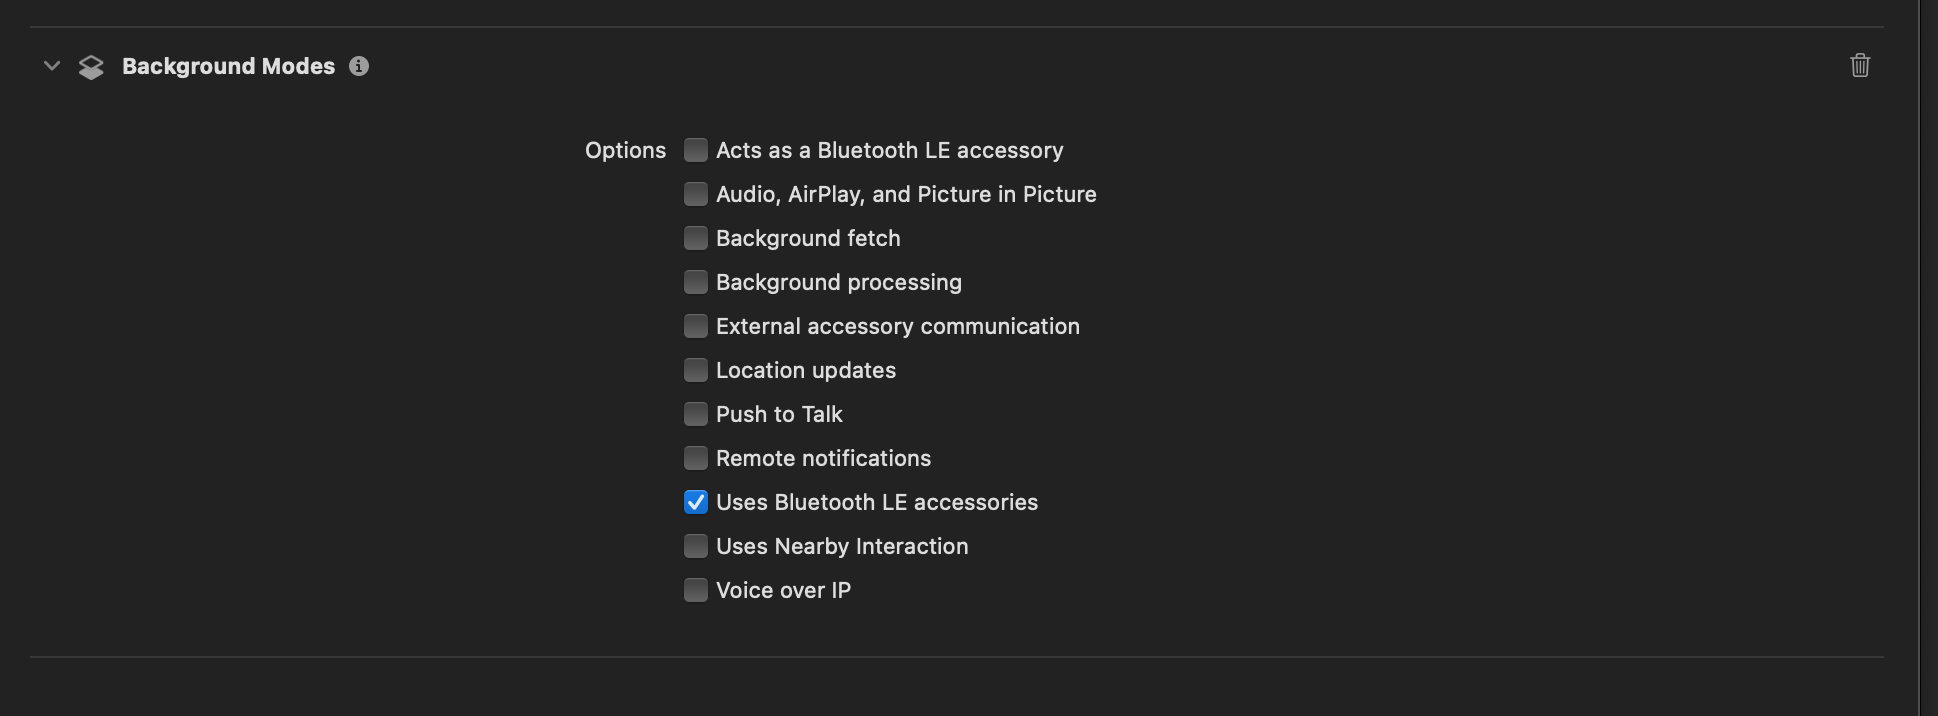 Image 2. Adding suggested Background mode.
Next, we need to add the Privacy usage description for Bluetooth. In project's Info.plist add either NSBluetoothAlwaysUsageDescription (Privacy - Bluetooth Always Usage Description) if you're targeting iOS 13 and later, or NSBluetoothPeripheralUsageDescription (Privacy - Bluetooth Always Usage Description) for iOS 12 and lower (Image 3). Along with the key, add an User-facing description text that will be shown like in the Image 4. This prompt will be shown to user when we start scanning for peripheral(s), first time only.
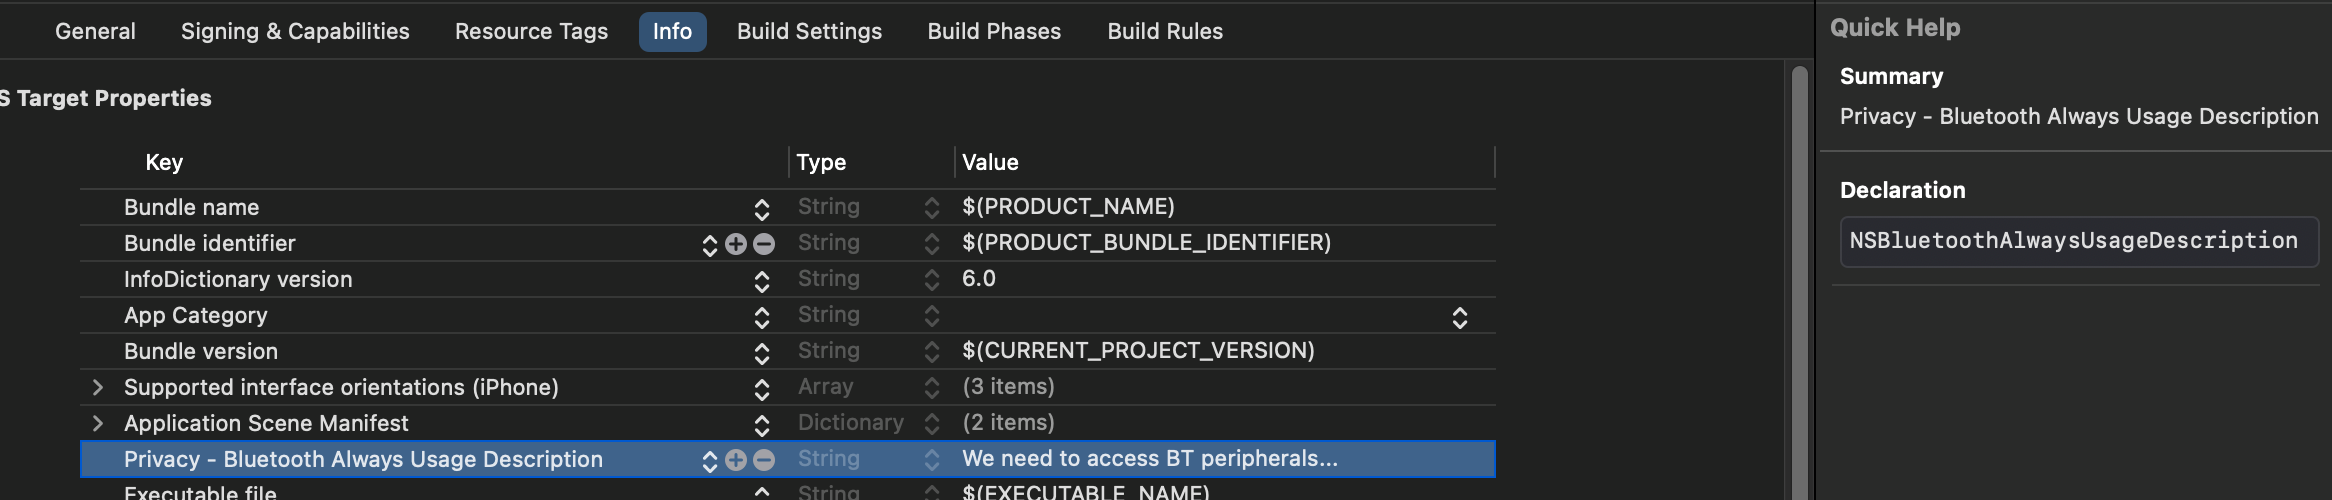 Image 3. Bluetooth usage description.
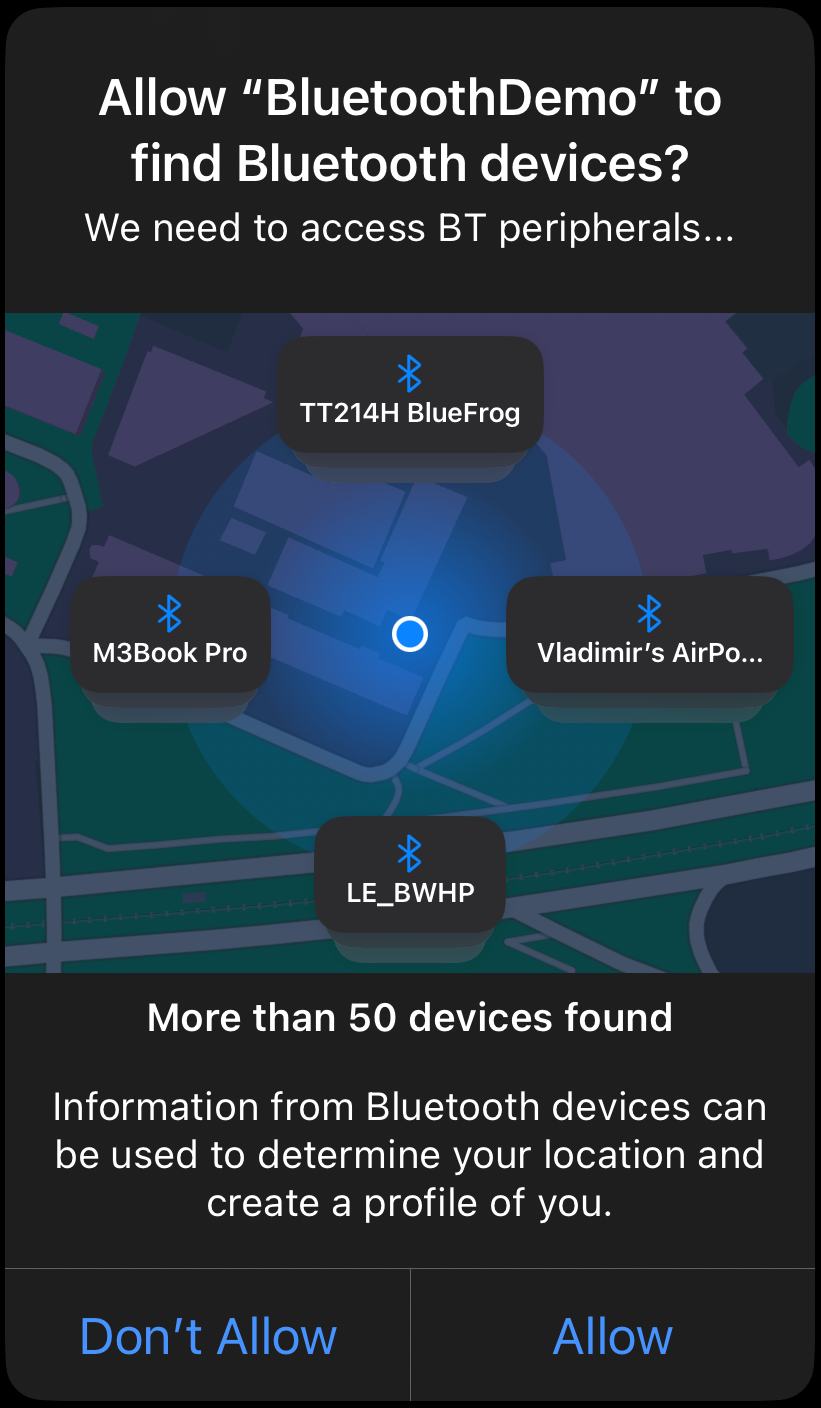 Image 4. User facing privacy prompt.
Failing to add the usage description text will result in app crash with the following warning displayed in Xcode console (Image 5).
 Image 5. Error from Xcode console
CBCentralManager
With all this setup done, we're ready to start searching for Bluetooth peripherals. First step is to import Core Bluetooth:
import CoreBluetooth
With that done, we can instantiate the CBCentralManager and set ourselves to be CBCentralManagerDelegate. Make sure to keep a reference to it!. We can also provide a callback queue if we want delegate callbacks to be called on a specific queue. Default is the main queue.
let manager = CBCentralManager()
manager.delegate = self
Next step would be to start discovering services, but it is important to check the bluetooth state. On setting ourselves as delegate, func centralManagerDidUpdateState(_ central: CBCentralManager) delegate method of CBCentralManagerDelegate will be called passing the determined state - CBManagerState.unknown, .resetting, .unsupported, .unauthorized, .poweredOff or .poweredOn. We need to be in the .poweredOn state to use peripherals.
Discovering and connecting to peripherals
Once we're determined to be powered on, we can scan for peripherals. We can either scan for all available peripherals
manager.scanForPeripherals(withServices: nil)
or if we know the service we want to connect to, we can pass its CBUUID and Core Bluetooth will report only found devices with matching advertised service. For e.g. Fitness Device (FTMS) compatibile devices, we'd scan:
extension CBUUID {
    static let fitnessDevice = CBUUID(string: "0x1826")
}

manager.scanForPeripherals(withServices: [.fitnessDevice])
With that scan started, delegate conforming to CBCentralManagerDelegate will be called with delegate method func centralManager(_ central: CBCentralManager, didDiscover peripheral: CBPeripheral, advertisementData: [String: Any], rssi RSSI: NSNumber). It will be called with each discovered peripheral for us to handle. We can either fetch of all peripherals and pass it to an user-facing list to give the user option to connect to a particular one, or implement some kind of logic to determine the desired device. In the latter case, we first need to store the reference to the chosen peripheral, then stop the scan to prevent discovering more (unneeded) peripherals and connect to that peripheral.
Make sure to keep a reference to the peripheral you want to start using, as the framework will not retain it and you'll lose reference to it. It is also suggested to do the same for services and characteristics; they will not be deallocated as they are properties of the peripheral object, but references will be handy as you'll be needing them for later communication.
Also, in the delegate method parameters, apart from discovered peripheral, we're passed additional Advertisement data that we can ispect for further device filtering, as well as connection signal strength (RSSI).
func centralManager(
        _ central: CBCentralManager,
        didDiscover peripheral: CBPeripheral,
        advertisementData: [String: Any],
        rssi RSSI: NSNumber
    ) {
        self.peripheral = peripheral
        central.stopScan()
        central.connect(peripheral)
    }
This will start the connection to selected peripheral. Once connected, the following CBCentralManagerDelegate method is called
func centralManager(
        _ central: CBCentralManager,
        didConnect peripheral: CBPeripheral
    ) {
        peripheral.delegate = self
        peripheral.discoverServices(nil)
    }
This completes the connection process and CBCentralManagerDelegate use (although we may rely on func centralManager(_ central: CBCentralManager, didDisconnectPeripheral peripheral: CBPeripheral, error: (any Error)?) method as well for cleanup upon disconnecting from it).
Discovering services et al.
Here we can set a delegate (CBPeripheralDelegate) for the connected peripheral and start discovering peripheral services. We can either scan for all services (nil parameter), or target a specific service we know CBUUID(s) for.
Now we start utilizing CBPeripheralDelegate and its methods. First, we're called with method that displays all discovered services for the passed peripheral
extension CBUUID {
    static let fitnessDevice = CBUUID(string: "0x1826")
}

func peripheral(
        _ peripheral: CBPeripheral,
        didDiscoverServices error: (any Error)?
    ) {
        for service in peripheral.services ?? [] {
            if service.uuid == .fitnessDevice {
                peripheral.discoverCharacteristics(nil, for: service)
            }
        }
    }
As noted above, in method body we can inspect services and start characteristic discovery for services of interest. This will call the next CBPeripheralDelegate method (in the example Fitness service training data, control and control response services are filtered out and used)
extension CBUUID {
    static let trainingData = CBUUID(string: "0x2ACD")
    static let controlResponse = CBUUID(string: "0x2ADA")
    static let control = CBUUID(string: "0x2AD9")
}

func peripheral(
        _ peripheral: CBPeripheral,
        didDiscoverCharacteristicsFor service: CBService,
        error: (any Error)?
    ) {
        service.characteristics?.forEach {
            print("Discovered characteristic \($0)")
            if let value = $0.value {
                let name = String(decoding: value, as: UTF8.self)
                print("Name: \(name)")
            }
            if $0.uuid == .trainingData {
                print("Info found and set")
                peripheral.setNotifyValue(true, for: $0)
                info = $0
            }

            if $0.uuid == .control {
                print("Control found and set")
                peripheral.readValue(for: $0)
                peripheral.setNotifyValue(true, for: $0)
                self.control = $0
            }

            if $0.uuid == .controlResponse {
                print("Control response found and set")
                peripheral.setNotifyValue(true, for: $0)
                self.controlResponse = $0
            }
        }
    }
We iterate the service's characteristics and determine the ones we're interested in. Also please note that we're also keeping reference to all desired characteristics. We also poll characteristics for information:
Reading and writing data
Reading data
We can get data from Bluetooth characteristics in two ways:
- We can request one-time data read -
.readValue(for: <characteristic>) - Request to be automatically notified on any updates the device sees fit -
.setNotifyValue(<enabled>, for: <characteristic>)
For the first option, device will return requested data one-time only, and for the latter it will keep sending updates any time it has some, untill we set notify value to false (or disconnect).
Also, please note as in the .control characteristic example above, setting to notifying characteristic does not necessarily mean that characteristic will post first update on subscription time; it can send updates once there actually are updates, which may happen only at some point in the future.. So if you need immediate data, do both a manual one-time read, and then subscribe to all further updates.
The peripheral will now send new data, and CoreBluetooth will call the following delegate method with updates (for both cases above)
func peripheral(
        _ peripheral: CBPeripheral,
        didUpdateValueFor characteristic: CBCharacteristic,
        error: (any Error)?
    ) {
        switch characteristic {
        case info:
            parseInfo(from: characteristic)
        case control:
            parseControl(from: characteristic)
        case controlResponse:
            parseControlResponse(from: characteristic)
        default:
            ()
        }
Here we can read the sent data, but as we parse different characteristic payloads differently we determine which payload was received and pass the data to a dedicated parser.
As each characteristic will send data in its format, which can be either per some BT standard or fully custom payload, this MOP will not go into full specifics for examples above. However, in general characteristic will send a byte-array containing various data.
We can acces it by accessing characteristic's data (optional data)
guard let data: Data = characteristic.value else { return }
we can use that data in any manner, but most common case is to further convert it to byte-array
let bytes: [UInt8] = Array(data)
Now, the most common cases here are
- we're getting a single 8-bit value, e.g. 0-255
let byte = data[0]
One example of this can be a heart rate info that is by nature unsigned (0+) and in practically all cases less than 255
- We may be getting Integer data that is larger than 0-255
In this case we may be getting two-byte [UInt8] array which we must combine to e.g. UInt16. Let's say we have [byte1, byte2], we have numerous options to do so, but one may be to:
- cast each byte to UInt16
- bit-shift various bytes by 8 bits and combine them all together
e.g. for speed information we may do
let speed: UInt16 = UInt16(bytes[1]) << 8 + UInt16(bytes[0])
Here we shift the first byte and add the remainder, making sure we respect the endian-ness of the data.
In real-life use speed might be a floating-point value. By FTMS spec, speed is sent as UInt16 in two UInt8 bytes, and is in 0.01 km/h. Therefore, to get speed we must cast the integer value to floating point number and divide by 100. For example, speed of 5.2 km/h would be reported as 520.
Of course for Int32, we'd need shift 4 bytes and combine them, and so on....
- We may be getting a bitwise data information
Let's say we're getting some automation schedule, if the automation is enabled for a particular day (1) or disabled (0). As we have 8 bits in a byte, we can per specification determine which day is represented by which bit. Now we can have e.g. this format, shown in binary representation
// Days:             MTWTFSN
let days: UInt8 = 0b00010100
In this example, automation is set for wednesdays and fridays.
To determine if the automation is active on wednesday we have many options, e.g.
let isActiveOnWednesday: Bool = ((days >> 4) & 0x01) == 1
or anything equivalent.
- Or a combination of
It is often a data-package is received where first bit or bits are bitwise option flags denoting the rest of the payload. In that case we first need to determine the passed values by inspecting the flag bits (e.g by using step 3), and then interpret the rest of the data (e.g. by using step 2)
If some option, e.g. Treadmill incline bit, is set to 0, e.g. not used, the remaining payload bit array will be 2 bytes shorter than if the data is present. Always make sure to check which data is present and interpret the remainder, especially making sure you don't access outside the array's bounds!
- Or really a binary stream to handle otherwise.
In that case perhaps casting to [UInt8] is not needed, we just collect Data and decode it.
Writing data
For writing data, we need a reference of characteristic to write to, and then further we need to know the payload shape (number of bytes and their meaning). We can reverse the procedures from the section above to convert various information into bytes and byte-array and then to Data that we'll send to peripheral (characteristic). Once we have the payload prepared, we call the write method on the characteristic, e.g.
private func set(speed: Double, inclination: Double) {
        guard let control, let peripheral else { return }

        let convertedSpeed = UInt16(convertDouble(speed, factor: 100))
        peripheral.writeValue(
            .speedCommand(convertedSpeed), for: control, type: .withResponse)

        peripheral.writeValue(.startCommand, for: control, type: .withResponse)
}

extension Data {
    static let startCommand = Data([0x07])
    static let stopCommand = Data([0x08])
    static let resetCommand = Data([0x01])

    static func speedCommand(_ speed: UInt16) -> Data {
        let speedBytes = Swift.withUnsafeBytes(of: speed.littleEndian) {
            Array($0)
        }
        return Data([0x02] + speedBytes)
    }
}

extension CBUUID {
    static let control = CBUUID(string: "0x2AD9")
}
In this particular example, we need to
- make sure we have a reference to
controlcharacteristic we want to write to, and the associatedperipheral. - Then, e.g. for speed, we need to convert speed from e.g. 5.2 km/h to expected 520 UInt16, and then further to byte array.
- Also in this particular example, the speed command consists of the "speed target endpoint" -
0x02followed by two bytes with speed data. - With that prepared data, we
.writeValueto characteristic, passing the speed data. - Write can be either
.withResponseor.withoutResponse, stating if we want response to be sent to e.gcontrolResponsecharacteristic.
In this particular case, after setting the new speed Treadmill will just use it as in-memory unused command. To commit it (execute speed change), we must send a start command afterwards. This is a particularity of this use case and is noted as a caveat that it may happen, but also may not be required.
However, we may not be able to opt out if we don't want response - the device may require to send the response after write although we don't really need it. Setting .withoutResponse will error-out the write command and appropriate error will be logged in the console - that .withResponse is required. In that case, we must receive the response but are free to ignore it.
Further notes
Objects used
To sum up, we start with CBCentralManager class to handle searching for peripherals. It will receive callbacks via the CBCentralManagerDelegate. Once we connect to peripheral, we switch to CBPeripheralDelegate methods further.
As for the components hierarchy, it is as follows (Image 6):
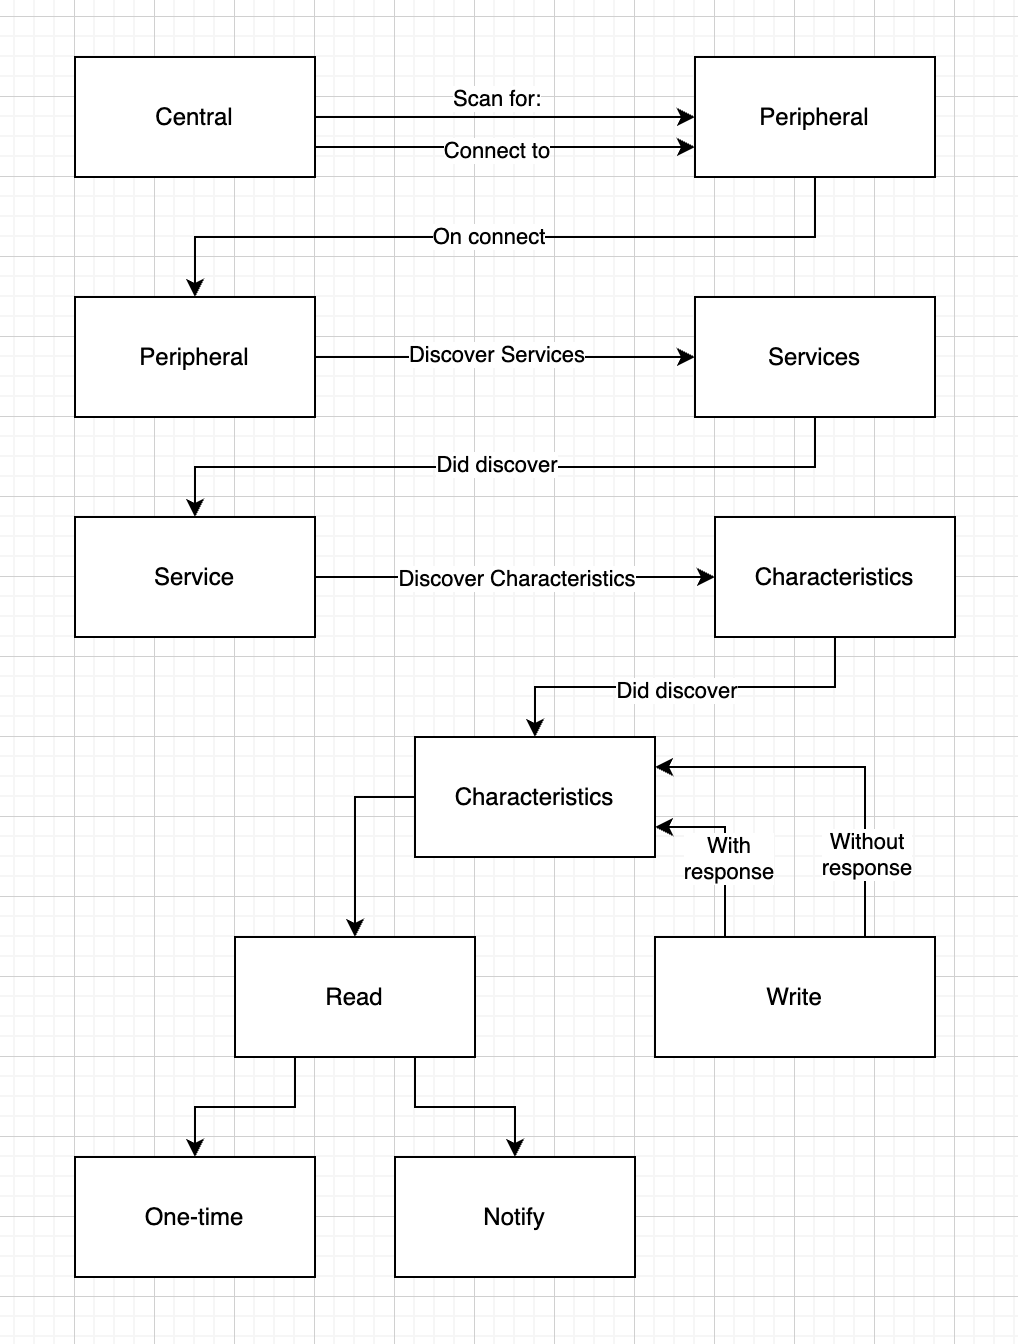 Image 6. Bluetooth objects hierarchy
Reconnecting to known peripherals
Once we've once connected to a known peripheral, we may omit user-facing discovery process (and possibly list filtering etc) and use the CBUUID of the device to connect directly to it, for a seamless user-experience for successive app uses. In that case, we need to have CBPeripheral.identifier stored and in peripheral discovery and wait for that device to appear. Once detected, we can stop the scan and start the connection process.
Alternatively, you can try to reconnect to it using
let knownPeripheralUUID = UUID(uuidString: "<somehow-stored-uuid>")!
let knownPeripherals = centralManager.retrievePeripherals(withIdentifiers: [knownPeripheralUUID])
(Auto)connecting in background
We can utilize the background mode as described in the beginning in the document to pass the info to Core Bluetooth for devices we want to scan and use in background. This will register the intent with the OS which periodically scans the surroundings for all devices. With all capabilities set, intent registration and delegates set, OS will wake/start the app when requested device is detected so we can connect to it.
Links for further reading
- Core bluetooth - Apple documentation
- FTMS specification - Containing particularities for the examples used in this document
- FTMS example use
- Heart rate monitor - example how to connect to Heart Rate service and parse the data
- Background example - Connecting to devices in background / restoring connection